How to Draw Biomechanical Tattoo Designs: A Comprehensive Guide
Interested in fusing flesh and machine? Then you’ve come to the right place. This guide delves into the captivating world of biomechanical tattoo design, offering a comprehensive roadmap for artists of all skill levels. Whether you’re a seasoned tattoo artist looking to expand your repertoire or a budding artist fascinated by the genre, this resource will equip you with the knowledge and techniques needed to create stunning biomechanical masterpieces. We’ll go beyond the basics, exploring the core principles, advanced techniques, and essential considerations that separate a good biomechanical tattoo from an extraordinary one. Our aim is to provide you with the knowledge and inspiration to craft truly unique and impactful designs.
Understanding Biomechanical Tattoo Art
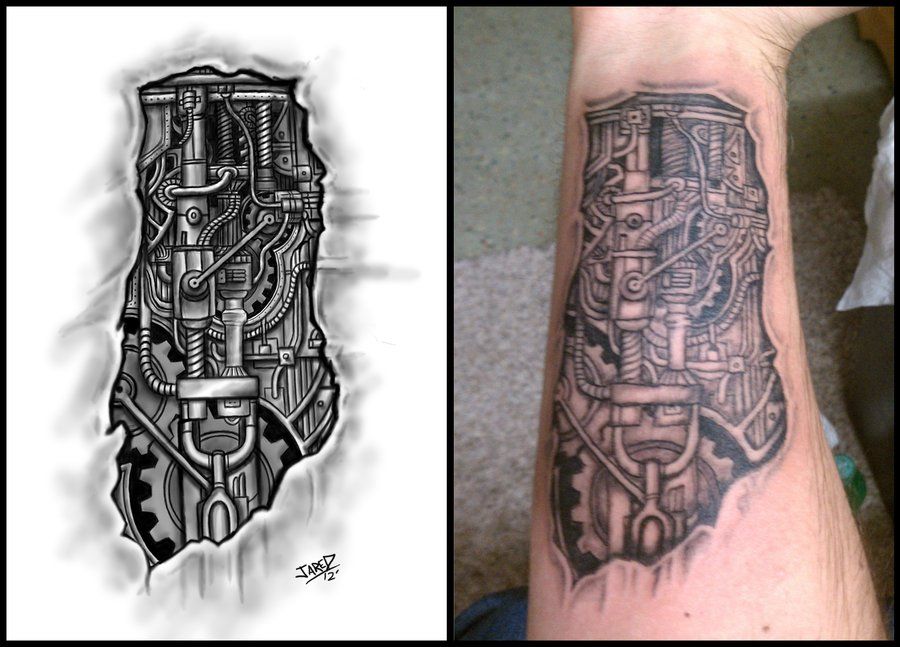
Biomechanical tattoo art is more than just drawing robots on skin. It’s a complex and fascinating genre that blends organic forms with mechanical elements, creating a seamless fusion of flesh and machine. It draws inspiration from science fiction, industrial design, and the human anatomy, resulting in intricate and visually striking designs. The key lies in creating a sense of realism and believability, making the mechanical components appear as if they are integrated directly into the body.
This style evolved from the airbrush art of H.R. Giger, made famous by his work on the movie *Alien*. The style moved from science fiction to tattoos in the late 1980s and early 1990s, and has continued to evolve as tattoo artists have brought their own spin to the style. Modern biomech often involves bright colors, complex layering, and even 3D effects.
Understanding the underlying principles of biomechanical design is crucial for creating compelling tattoos. This includes a strong grasp of anatomy, perspective, and shading techniques. It also requires a keen eye for detail and an understanding of how mechanical components function. Recent trends indicate a growing interest in incorporating elements of nature, such as roots, vines, and skeletal structures, into biomechanical designs, blurring the lines between organic and artificial even further.
Essential Tools and Materials
While digital tools are increasingly popular, mastering the fundamentals of traditional drawing is essential for any aspiring biomechanical tattoo artist. Here’s a breakdown of the tools you’ll need:
- Pencils: A range of graphite pencils (HB, 2B, 4B, 6B) for sketching and shading.
- Erasers: Kneaded erasers and pencil erasers for correcting mistakes and creating highlights.
- Paper: Smooth drawing paper or Bristol board for clean lines and detailed rendering.
- Pens: Fine-liner pens (0.1mm, 0.3mm, 0.5mm) for outlining and adding intricate details.
- Markers: Alcohol-based markers (e.g., Copic, Prismacolor) for adding color and creating gradients.
- Rulers and Compasses: For precise lines, circles, and geometric shapes.
- Reference Materials: Anatomy books, mechanical diagrams, and examples of biomechanical art for inspiration and reference.
For digital artists, a drawing tablet (e.g., Wacom, iPad Pro) and stylus are essential, along with software such as Procreate, Adobe Photoshop, or Corel Painter.
Deconstructing the Biomechanical Aesthetic: Key Features
Biomechanical designs are characterized by a unique set of features that set them apart from other tattoo styles. Mastering these features is key to creating authentic and visually stunning biomech tattoos.
- Organic Integration: The mechanical components should appear seamlessly integrated into the body, as if they are extensions of the muscles, bones, and tendons.
- Anatomical Accuracy: A strong understanding of anatomy is crucial for creating believable designs. The mechanical elements should follow the natural contours of the body and interact with the underlying musculature.
- Mechanical Detail: Add intricate details such as gears, pistons, wires, and tubes to create a sense of realism and complexity.
- Dynamic Flow: The design should have a sense of movement and energy, flowing with the natural lines of the body.
- Textural Contrast: Use a variety of shading techniques to create contrast between the smooth, metallic surfaces of the mechanical elements and the soft, organic textures of the skin.
- Depth and Dimension: Create a sense of depth and dimension by using perspective, overlapping elements, and strategic shading.
- Color Palette: While black and grey are common, experiment with metallic colors, vibrant hues, and contrasting shades to create visually striking designs.
Step-by-Step Guide: Drawing a Biomechanical Tattoo Design
Let’s walk through the process of creating a simple biomechanical tattoo design. This example will focus on a design for the upper arm, integrating mechanical elements with the bicep muscle.
- Sketch the Anatomy: Begin by sketching the basic outline of the bicep muscle. This will serve as the foundation for your design.
- Incorporate Mechanical Elements: Start adding mechanical elements such as gears, pistons, and tubes, following the contours of the muscle. Think about how these elements might connect to and interact with the underlying anatomy.
- Add Detail and Texture: Refine the details of the mechanical elements, adding intricate lines, shading, and texture. Use a variety of line weights to create contrast and visual interest.
- Create Depth and Dimension: Use perspective and overlapping elements to create a sense of depth and dimension. Add shadows and highlights to enhance the three-dimensional effect.
- Refine the Design: Step back and evaluate your design. Make any necessary adjustments to improve the flow, balance, and overall composition.
- Finalize the Outline: Once you are satisfied with the design, finalize the outline using a fine-liner pen or digital drawing tool.
- Add Shading and Color: Add shading and color to bring your design to life. Experiment with different techniques to create a variety of textures and effects.
Advanced Techniques for Biomechanical Tattoo Design
Once you’ve mastered the fundamentals, you can start exploring more advanced techniques to elevate your biomechanical tattoo designs.
- 3D Effects: Use advanced shading and perspective techniques to create the illusion of three-dimensional objects popping out of the skin.
- Negative Space: Incorporate negative space into your designs to create visual interest and highlight specific elements.
- Fractal Patterns: Use fractal patterns to add complexity and visual interest to your designs.
- Organic Integration: Incorporate organic elements such as roots, vines, and skeletal structures into your designs to create a more natural and believable fusion of flesh and machine.
- Color Theory: Develop a strong understanding of color theory to create visually striking and harmonious color palettes.
Inspiration and Reference Materials
Surrounding yourself with inspiration is crucial for developing your own unique style. Here are some resources to explore:
- H.R. Giger: The master of biomechanical art. Study his work to understand the core principles of the genre.
- Science Fiction Art: Explore the works of science fiction artists such as Syd Mead and Chris Foss for inspiration.
- Industrial Design: Study the designs of industrial products such as cars, motorcycles, and machinery for inspiration.
- Anatomy Books: Develop a strong understanding of anatomy by studying anatomy books and diagrams.
- Tattoo Artists: Follow the work of contemporary biomechanical tattoo artists on social media and in tattoo magazines.
Biomechanical Tattoo Design Software: A Digital Revolution
The rise of digital art has revolutionized the way biomechanical tattoo designs are created. Software like Procreate and Adobe Photoshop, paired with drawing tablets, offers unparalleled flexibility and control. These tools allow artists to experiment with complex layering, intricate details, and dynamic color palettes with ease. Furthermore, digital platforms facilitate seamless collaboration with clients, enabling real-time feedback and adjustments to ensure the final design perfectly aligns with their vision.
Unlocking Creative Potential: Key Features of Digital Design
Digital design software offers a plethora of features that empower biomechanical tattoo artists:
- Layering Systems: Non-destructive layering allows for intricate compositions and easy adjustments without affecting underlying elements.
- Brush Libraries: A vast array of brushes simulates various textures and effects, from smooth metallic finishes to rough, organic surfaces.
- Color Palettes: Digital color palettes enable precise color selection and experimentation, ensuring harmonious and visually striking designs.
- Transformation Tools: Tools like perspective correction, warping, and skewing allow for manipulating elements to fit the body’s contours seamlessly.
- Import/Export Capabilities: Easily import reference images and export designs in various formats for printing or sharing with tattoo artists.
- Undo/Redo Functionality: Makes experimenting and correcting mistakes easy.
- Customizable Workspace: Tailor the software interface to suit your individual workflow and preferences.
The Advantages of Digital Biomechanical Tattoo Design
Digital design offers numerous advantages over traditional methods, streamlining the creative process and enhancing the final product.
- Increased Efficiency: Digital tools accelerate the design process, allowing artists to create complex designs in less time.
- Enhanced Precision: Digital software provides unparalleled precision and control, enabling artists to create intricate details with ease.
- Greater Flexibility: Digital designs can be easily modified and adjusted, allowing for seamless collaboration with clients and tattoo artists.
- Non-Destructive Editing: Changes can be made without permanently altering the original artwork, preserving the integrity of the design.
- Easy Sharing and Collaboration: Digital designs can be easily shared and collaborated on remotely, facilitating communication and feedback.
Procreate for Biomechanical Tattoo Design: A Deep Dive
Procreate has emerged as a favorite among tattoo artists, particularly for biomechanical designs, thanks to its intuitive interface, powerful features, and affordability. Its user-friendly design allows artists to quickly grasp the fundamentals, while its advanced capabilities cater to even the most seasoned professionals. The app’s responsive brush engine, coupled with its robust layering system, makes it ideal for creating the intricate details and complex compositions that define biomechanical art. The ability to import reference images directly into the canvas and seamlessly integrate them into the design process further enhances Procreate’s appeal.
Pros:
- Intuitive and user-friendly interface
- Responsive brush engine for natural-looking strokes
- Powerful layering system for complex compositions
- Affordable price point compared to other professional software
- Large and active community for support and inspiration
Cons:
- Limited vector capabilities compared to Adobe Illustrator
- Can be resource-intensive on older devices
- No native cloud syncing across devices
Ideal User:
Procreate is best suited for artists who are comfortable with raster-based design and prefer a more intuitive and tactile drawing experience. It’s an excellent choice for both beginners and experienced artists looking for a powerful and affordable tool for creating biomechanical tattoo designs.
Alternatives:
Adobe Photoshop offers similar features but has a steeper learning curve and requires a subscription. Autodesk Sketchbook is a free alternative with a simplified interface, but it lacks some of Procreate’s advanced features.
Overall Verdict:
Procreate is an outstanding tool for biomechanical tattoo design, offering a perfect balance of power, affordability, and user-friendliness. Its intuitive interface and robust features make it an excellent choice for artists of all skill levels. We highly recommend it for anyone looking to create stunning biomechanical tattoos digitally.
Developing Your Unique Biomechanical Style
While it’s important to study the works of others, the key to becoming a successful biomechanical tattoo artist is to develop your own unique style. This involves experimenting with different techniques, incorporating your own personal influences, and pushing the boundaries of the genre. Don’t be afraid to break the rules and try new things. The most innovative and exciting biomechanical tattoos are often those that defy convention.
Embrace the Fusion of Flesh and Machine
Drawing biomechanical tattoo designs is a challenging but rewarding art form. By mastering the fundamentals, exploring advanced techniques, and developing your own unique style, you can create stunning and impactful tattoos that capture the imagination. Whether you choose to work traditionally or digitally, the key is to embrace the fusion of flesh and machine and to push the boundaries of what’s possible. So, grab your pencils or stylus, and start creating your own biomechanical masterpieces!
