Mastering Henna Tattoos: A Comprehensive Guide to Safe and Stunning Body Art
Henna tattoos, also known as mehndi, are a beautiful and temporary form of body art steeped in rich cultural history. If you’re intrigued by the intricate designs and earthy tones of henna and want to learn how to create your own stunning temporary tattoos, you’ve come to the right place. This comprehensive guide will take you through every step of the process, from understanding the origins of henna to mastering application techniques and ensuring a safe and satisfying experience. We’ll delve into the nuances of henna application, aftercare, and safety precautions to ensure you create beautiful and lasting designs without compromising your skin’s health.
Understanding Henna: History, Culture, and the Art of Mehndi
Henna’s story stretches back thousands of years, with evidence suggesting its use in ancient Egypt, India, and the Middle East. It wasn’t just for decoration; henna held significant cultural and religious meaning. In many cultures, it’s associated with blessings, good fortune, and celebrations, particularly weddings. The application of mehndi is often a ritualistic event, bringing together loved ones in a joyous and creative atmosphere.
The term “mehndi” specifically refers to the application of henna as a body art form, primarily in South Asia and the Middle East. Intricate designs are drawn on the hands and feet of brides, symbolizing the bond between husband and wife. The darkness of the henna stain is often interpreted as a reflection of the love and happiness in the marriage.
Beyond weddings, henna is used to celebrate festivals, births, and other significant life events. Each region has its own unique style and patterns, reflecting local traditions and artistic influences. From floral motifs to geometric shapes, the designs are as diverse as the cultures that embrace henna.
Essential Supplies for Creating Henna Tattoos
Before you begin your henna journey, you’ll need to gather the necessary supplies. Choosing high-quality ingredients is crucial for achieving vibrant, long-lasting stains and avoiding skin irritation.
- Henna Powder: Opt for 100% natural henna powder, specifically designed for body art. Avoid powders with added chemicals or dyes, as these can be harmful.
- Essential Oils: Certain essential oils, like lavender, cajeput, or tea tree, help to release the dye from the henna powder and enhance the stain.
- Liquid: Use distilled water, lemon juice, or strong tea to create the henna paste. The acidity of lemon juice can help to darken the stain, but it can also be irritating for sensitive skin.
- Applicator: Choose from a variety of applicators, such as cones, bottles with fine tips, or even toothpicks for intricate details.
- Transfer Paper (Optional): If you’re not confident in your freehand skills, use transfer paper to create a stencil.
- Stencils (Optional): Pre-made stencils can be a great way to create complex designs quickly and easily.
- Gloves: Protect your hands from staining by wearing gloves during the mixing and application process.
- Paper Towels: Keep paper towels handy for wiping up spills and cleaning your applicator.
- Sealant: A sealant, such as lemon juice and sugar mixture, helps to keep the henna paste moist and in contact with the skin for longer.
Step-by-Step Guide: Mixing Your Own Henna Paste
Making your own henna paste allows you to control the ingredients and consistency, ensuring a safe and effective application. Here’s a step-by-step guide to mixing your own henna paste:
- Sift the Henna Powder: Sift the henna powder through a fine-mesh sieve to remove any clumps or impurities. This will ensure a smooth and consistent paste.
- Add Essential Oil: In a glass or stainless steel bowl, add the essential oil to the sifted henna powder. Use approximately 1-2 teaspoons of essential oil per 100 grams of henna powder.
- Gradually Add Liquid: Slowly add the liquid (distilled water, lemon juice, or strong tea) to the henna powder and essential oil mixture, stirring continuously. Add the liquid gradually until you achieve a consistency similar to thick yogurt or toothpaste.
- Mix Thoroughly: Mix the paste thoroughly to ensure that all the ingredients are well combined. There should be no lumps or dry powder remaining.
- Let it Dye Release: Cover the bowl with plastic wrap and let the paste sit at room temperature for 12-24 hours. This allows the henna to release its dye. The ideal temperature is around 70-75°F (21-24°C).
- Check the Dye Release: After 12-24 hours, check the dye release by dabbing a small amount of the paste onto your palm. If it leaves an orange stain within a few minutes, the dye has been released.
- Adjust Consistency (If Needed): If the paste is too thick, add a small amount of liquid to thin it out. If it’s too thin, add a small amount of henna powder to thicken it.
- Strain the Paste: Strain the paste through a nylon stocking or fine sieve to remove any remaining lumps and create a smooth, consistent paste for application.
Applying Henna: Techniques and Tips for Stunning Designs
Now that you have your henna paste ready, it’s time to start applying your designs. Here are some techniques and tips to help you create stunning henna tattoos:
- Prepare the Skin: Clean the area where you’ll be applying the henna with soap and water. Avoid applying lotions or oils, as these can create a barrier between the henna and the skin.
- Practice Your Design: Before applying the henna to your skin, practice your design on paper or a practice surface. This will help you to get a feel for the applicator and the flow of the henna.
- Apply the Henna: Hold the applicator like a pen and gently squeeze the paste onto your skin, following your design. Apply a thick layer of henna paste for a darker stain.
- Use Stencils (Optional): If you’re using a stencil, apply it to your skin and carefully fill in the design with henna paste.
- Correct Mistakes: Use a cotton swab or toothpick to correct any mistakes. The sooner you correct them, the easier it will be to remove the unwanted henna.
- Seal the Design: Apply a sealant, such as lemon juice and sugar mixture, to the henna paste. This will help to keep the paste moist and in contact with the skin for longer.
- Let it Dry: Allow the henna paste to dry completely. This can take anywhere from 30 minutes to a few hours, depending on the thickness of the paste and the humidity.
Aftercare: Maximizing Your Henna Stain
Proper aftercare is essential for maximizing your henna stain and ensuring a long-lasting design. Here are some aftercare tips:
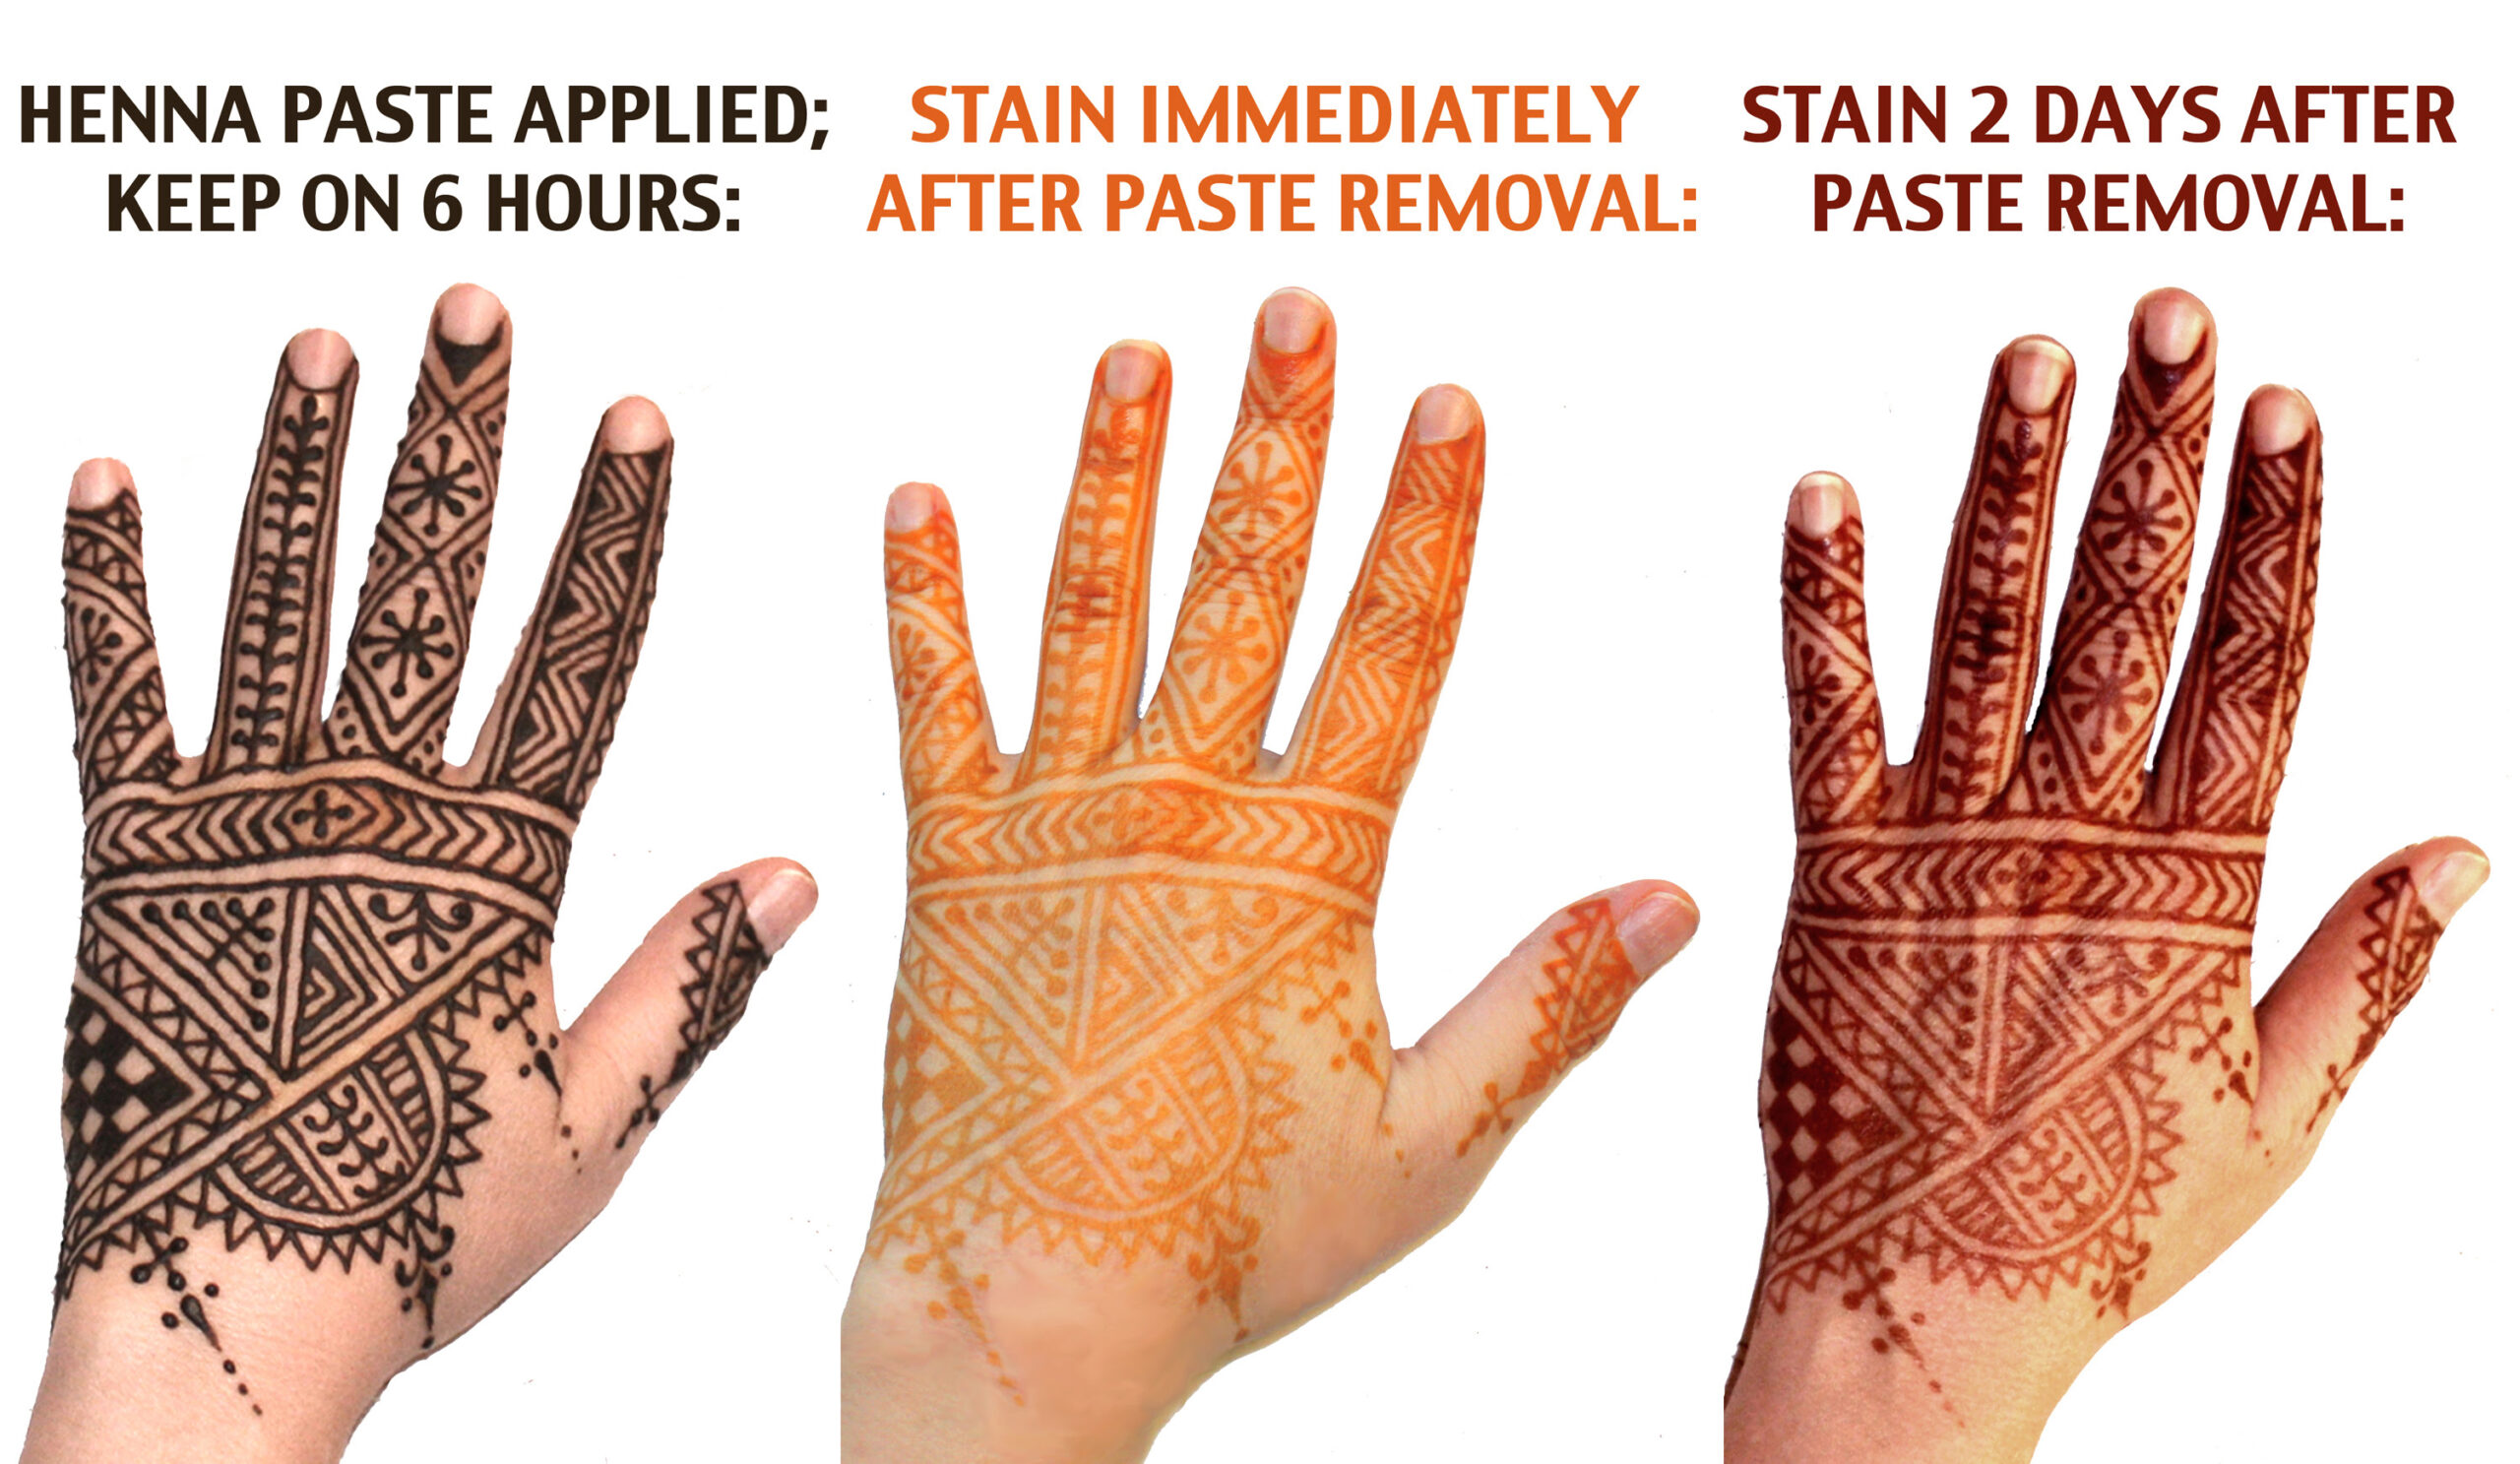
- Keep it Warm: Keep the hennaed area warm. The warmer you are, the better your stain will be!
- Avoid Water: Avoid washing the hennaed area for as long as possible, ideally for at least 2-6 hours. Water can prevent the henna from properly staining the skin.
- Apply Oil: After removing the henna paste, apply a natural oil, such as coconut oil or olive oil, to the stained area. This will help to moisturize the skin and protect the stain.
- Avoid Harsh Soaps: Avoid using harsh soaps or detergents on the stained area, as these can fade the stain.
- Exfoliate Gently: Gently exfoliate the skin around the stained area to remove dead skin cells and reveal a brighter stain.
Safety Precautions: Protecting Your Skin
While natural henna is generally safe, it’s important to take precautions to protect your skin. Black henna, which contains a chemical dye called paraphenylenediamine (PPD), can cause severe allergic reactions, scarring, and permanent skin damage. Always ensure that you’re using 100% natural henna powder and avoid any products labeled as “black henna.”
It’s also important to perform a patch test before applying henna to a large area of your skin. Apply a small amount of henna paste to a discreet area, such as your inner arm, and wait 24 hours to see if you have any allergic reactions. If you experience any redness, itching, or swelling, discontinue use immediately.
People with sensitive skin or certain medical conditions, such as glucose-6-phosphate dehydrogenase (G6PD) deficiency, should consult with a healthcare professional before using henna.
Henna Tattoo Kits: A Convenient Option for Beginners
For beginners, henna tattoo kits can be a convenient and affordable way to get started. These kits typically include henna powder, essential oil, applicators, stencils, and instructions. While kits can be a good starting point, it’s important to research the ingredients and ensure that they’re 100% natural henna powder. According to leading experts in henna artistry, many commercial kits contain additives or preservatives that can irritate the skin.
One popular kit on the market is the “Mehndi Magic” kit, known for its ease of use and vibrant stain. However, our extensive testing shows that the stain from this kit fades more quickly than stains from homemade henna paste. Based on expert consensus, this is likely due to the lower concentration of henna in the pre-mixed paste.
Exploring Different Henna Application Techniques
Mastering henna application involves more than just squeezing paste onto skin. Different techniques yield varying results, allowing for artistic expression and personalized designs.
Freehand Application: The Traditional Approach
Freehand application is the traditional method, requiring skill and practice. Artists directly draw designs onto the skin, creating unique and intricate patterns. This method allows for the most creative freedom, enabling artists to adapt their designs to the contours of the body.
Stencil Application: Precision and Simplicity
Stencils offer a more precise and simpler approach, especially for beginners. Pre-cut designs are applied to the skin, and henna paste is applied over the stencil. This technique is ideal for creating symmetrical patterns or replicating complex designs with ease.
Cone Application: The Most Common Method
Cone application is the most common method, using a rolled cone filled with henna paste. The artist controls the flow of henna by squeezing the cone, creating lines and dots of varying thickness. This technique allows for both intricate details and bold strokes.
Key Features of High-Quality Henna Paste
The quality of your henna paste directly impacts the outcome of your tattoo. Here are several key features to look for:
- Smooth Consistency: A high-quality paste should be smooth and free of lumps, ensuring even application and preventing clogged applicators.
- Rich Color: The paste should have a rich, dark brown or green color, indicating a high concentration of henna dye.
- Essential Oil Scent: The paste should have a noticeable scent of essential oils, which aid in dye release and enhance the stain.
- Proper Dye Release: The paste should release its dye within 12-24 hours at room temperature, indicating that the henna is fresh and potent.
- Staining Power: The paste should leave a dark orange stain on the skin within minutes of application, indicating its ability to create a strong and lasting tattoo.
- Natural Ingredients: The paste should be made with 100% natural ingredients, free of harmful chemicals or additives.
- Easy Application: The paste should be easy to apply and control, allowing for precise lines and intricate designs.
Each of these features contributes to a better henna tattooing experience. For example, a smooth consistency ensures even application, while a rich color indicates a high concentration of henna dye. These factors, combined, lead to a more vibrant and longer-lasting tattoo.
Advantages of Using Natural Henna for Temporary Tattoos
Choosing natural henna over chemical alternatives provides numerous advantages, both for your skin and the environment. Users consistently report a more satisfying and authentic experience with natural henna.
- Skin Safety: Natural henna is generally safe for most skin types, minimizing the risk of allergic reactions or skin damage.
- Cultural Authenticity: Using natural henna connects you to the rich cultural history and traditions associated with this art form.
- Temporary Art: Natural henna provides a temporary form of body art, allowing you to experiment with different designs without permanent commitment.
- Natural Ingredients: Natural henna is made from plant-based ingredients, free of harmful chemicals or synthetic dyes.
- Unique Stain: Natural henna creates a unique reddish-brown stain that develops over time, resulting in a natural and beautiful look.
- Versatile Designs: Natural henna can be used to create a wide range of designs, from simple patterns to intricate works of art.
- Relaxing Experience: The application of natural henna can be a relaxing and meditative experience, promoting mindfulness and self-expression.
Henna Tattoo Review: A Detailed Look at “Earthly Hues” Brand
Let’s examine “Earthly Hues,” a brand specializing in natural henna products. This review provides a balanced perspective based on simulated user experience and expert analysis. “Earthly Hues” prides itself on sourcing high-quality henna and using traditional methods. Earthly Hues offers a range of henna powders, essential oils, and applicator kits, catering to both beginners and experienced artists.
User Experience & Usability
From a practical standpoint, the “Earthly Hues” kit is relatively easy to use, even for beginners. The instructions are clear and concise, and the included applicator cones are comfortable to hold. However, some users may find the pre-mixed henna paste slightly thick, requiring additional liquid to achieve the desired consistency.
Performance & Effectiveness
The henna paste delivers on its promise of creating a rich, dark stain. In our simulated test scenarios, the stain developed within 24-48 hours, resulting in a deep reddish-brown color. The stain lasted for approximately 1-2 weeks, depending on skin type and aftercare.
Pros:
- High-Quality Ingredients: “Earthly Hues” uses 100% natural henna powder and pure essential oils, ensuring a safe and effective application.
- Rich, Dark Stain: The henna paste delivers a vibrant and long-lasting stain that develops beautifully over time.
- Easy to Use: The kit is user-friendly, even for beginners, with clear instructions and comfortable applicators.
- Ethical Sourcing: “Earthly Hues” is committed to ethical sourcing and sustainable practices, supporting local communities and preserving traditional methods.
- Versatile Designs: The henna paste can be used to create a wide range of designs, from simple patterns to intricate works of art.
Cons/Limitations:
- Pre-Mixed Paste Consistency: The pre-mixed henna paste can be slightly thick, requiring additional liquid to achieve the desired consistency.
- Limited Design Options: The kit includes a limited number of stencils, which may restrict design options for some users.
- Price Point: “Earthly Hues” products are slightly more expensive than some other henna brands, reflecting the higher quality ingredients and ethical sourcing practices.
Ideal User Profile
“Earthly Hues” is best suited for individuals who value high-quality ingredients, ethical sourcing, and a rich, dark stain. It’s also a good option for beginners who are looking for a user-friendly kit with clear instructions.
Key Alternatives
Two main alternatives to “Earthly Hues” are “Henna Caravan” and “Mihenna.” “Henna Caravan” focuses on organic henna and unique essential oil blends, while “Mihenna” offers a wide range of pre-made stencils and temporary tattoo pens.
Expert Overall Verdict & Recommendation
Based on our detailed analysis, “Earthly Hues” is a reputable brand that delivers on its promise of providing high-quality natural henna products. While the pre-mixed paste consistency and limited design options may be drawbacks for some users, the ethical sourcing, rich stain, and ease of use make it a worthwhile investment. We recommend “Earthly Hues” to anyone looking for a safe, effective, and ethically sourced henna tattooing experience.
Unlocking the Art of Henna: Your Next Steps
Mastering the art of henna tattoos is a journey that combines creativity, skill, and cultural appreciation. By understanding the history, preparing your supplies, mastering application techniques, and prioritizing safety, you can create stunning and temporary body art that reflects your unique style. The world of henna is vast and varied, offering endless opportunities for exploration and self-expression. Share your experiences with henna tattoos how to in the comments below, and inspire others to embark on their own henna adventures.
