
Stop the Drip: A Complete Guide on How to Fix a Leaky Sink Drain Pipe
A leaky sink drain pipe is more than just an annoyance; it’s a potential source of water damage, wasted water, and increased utility bills. The constant drip-drip-drip can drive you mad, but the good news is that, with the right knowledge and tools, fixing a leaky sink drain pipe is a DIY project many homeowners can tackle. This comprehensive guide will walk you through every step, from diagnosing the leak to making the final repairs, empowering you to regain control of your plumbing and save money in the process. We’ll cover everything from identifying the type of leak to selecting the right replacement parts, ensuring a long-lasting and effective fix.
Understanding Sink Drain Pipe Leaks: A Deep Dive
A sink drain system, while seemingly simple, is a complex network of pipes, fittings, and connections designed to efficiently remove wastewater. Leaks can occur at various points within this system, each with its own potential cause and solution. Understanding the anatomy of your sink drain and the reasons for leaks is the first step toward a successful repair.
The typical sink drain consists of several key components:
- The Sink Flange: This is the part that sits inside the sink basin and connects to the drain opening.
- The Tailpiece: A short pipe that extends down from the sink flange.
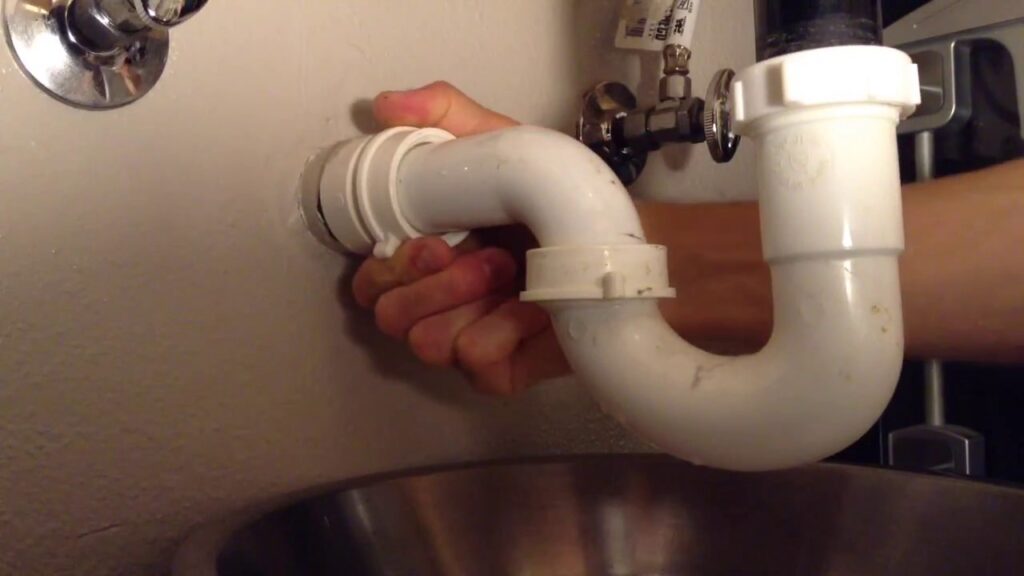
- The P-Trap: The curved section of pipe designed to trap debris and prevent sewer gases from entering your home. This is arguably the most important component.
- The Drainpipe: The pipe that carries wastewater away from the P-trap and into the main plumbing system.
- Fittings: Connectors that join the various pipes and components together (e.g., slip nuts, compression fittings).
Leaks often occur at these connection points due to:
- Loose Connections: Vibrations, temperature changes, or accidental bumps can loosen fittings over time.
- Worn Washers and Seals: Rubber or plastic washers and seals can degrade, crack, or become brittle, leading to leaks.
- Corrosion: Metal pipes, especially older ones, can corrode, creating pinholes or weakened areas that leak.
- Clogs: Blockages in the drain can increase pressure, forcing water to leak through weak points.
- Damage: Physical damage to the pipes or fittings can result in immediate leaks.
The importance of addressing a leaky sink drain pipe promptly cannot be overstated. Beyond the annoyance factor, even a small, slow leak can lead to significant water damage over time. This can manifest as:
- Mold and Mildew Growth: Damp environments are breeding grounds for mold and mildew, which can cause health problems and structural damage.
- Rotting Wood: Leaking water can saturate wooden cabinets and flooring, leading to rot and structural instability.
- Damaged Drywall: Water can seep into drywall, causing it to crumble and stain.
- Increased Water Bills: Even a slow drip can waste a surprising amount of water over time, increasing your water bill.
Therefore, understanding the nuances of sink drain systems and the potential consequences of leaks is crucial for effective and timely repair.
Essential Tools and Materials for Fixing a Leaky Sink Drain Pipe
Before you begin any repair work, gather the necessary tools and materials. Having everything on hand will make the job smoother and more efficient. The following list covers the essentials:
- Basin Wrench: A specialized wrench designed to reach and loosen nuts in tight spaces under the sink.
- Adjustable Wrench: A versatile wrench for general plumbing tasks.
- Channel-Lock Pliers: Useful for gripping and turning pipes and fittings.
- Screwdrivers (Phillips and Flathead): For removing screws and adjusting components.
- Plumber’s Putty: A pliable sealant used to create watertight seals around sink flanges and other connections.
- Teflon Tape (Plumber’s Tape): Used to seal threaded connections.
- New Washers and Seals: Replace any worn or damaged washers and seals with new ones.
- Replacement Pipes and Fittings: If any pipes or fittings are corroded or damaged, replace them with new ones. PVC is a common and affordable option.
- Bucket: To catch any water that may spill during the repair.
- Old Rags or Towels: For cleaning up spills and wiping down surfaces.
- Safety Glasses: To protect your eyes from debris.
- Gloves: To protect your hands from dirt and chemicals.
- Pen and Paper or Phone Camera: To document the disassembly process, which will help you reassemble everything correctly.
Selecting high-quality materials is crucial for a long-lasting repair. While cheaper options may be tempting, they often lack the durability and reliability of higher-quality components. Investing in quality parts will save you time and money in the long run by reducing the likelihood of future leaks.
Step-by-Step Guide: How to Fix a Leaky Sink Drain Pipe
Now that you have the tools and materials, let’s get to the actual repair. Follow these steps carefully to fix your leaky sink drain pipe:
- Shut Off the Water Supply: Locate the shut-off valves under the sink and turn them clockwise to stop the water flow. If you don’t have shut-off valves, you’ll need to turn off the main water supply to your house.
- Prepare the Work Area: Place a bucket under the drain to catch any remaining water. Clear the area under the sink of any obstructions.
- Identify the Leak Source: Carefully inspect the drainpipe to pinpoint the exact location of the leak. Look for drips, wet spots, or signs of corrosion.
- Loosen the Connections: Use a basin wrench or adjustable wrench to loosen the slip nuts connecting the drainpipe components. Work slowly and carefully to avoid damaging the pipes.
- Disassemble the Drainpipe: Once the connections are loose, carefully disassemble the drainpipe, starting with the P-trap. Pay attention to the order of the components and take pictures or notes to help with reassembly.
- Inspect the Components: Examine each component for signs of wear, damage, or corrosion. Replace any damaged parts with new ones. Check the washers and seals for cracks or brittleness.
- Clean the Threads: Use a wire brush or rag to clean the threads on the pipes and fittings. This will ensure a tight seal when you reassemble the drainpipe.
- Apply Plumber’s Putty: If you’re replacing the sink flange, apply a bead of plumber’s putty around the underside of the flange before installing it in the sink basin.
- Wrap Teflon Tape: Wrap Teflon tape around the threads of any threaded connections. This will help to create a watertight seal.
- Reassemble the Drainpipe: Carefully reassemble the drainpipe, following the order you documented during disassembly. Tighten the slip nuts by hand, then use a wrench to give them a final snug. Be careful not to overtighten, as this can damage the pipes or fittings.
- Test for Leaks: Turn on the water supply and check for leaks. If you see any leaks, tighten the connections further. If the leaks persist, disassemble the drainpipe and inspect the components again. You may need to replace a washer or fitting.
- Clean Up: Once you’re satisfied that the leak is fixed, clean up any spills and remove your tools and materials.
Throughout this process, remember that patience and attention to detail are key. Rushing through the steps can lead to mistakes and potential leaks. If you encounter any difficulties, don’t hesitate to consult a plumbing professional.
Advanced Techniques and Troubleshooting for Stubborn Leaks
While the steps above cover the most common scenarios, some leaks can be more challenging to fix. Here are some advanced techniques and troubleshooting tips for dealing with stubborn leaks:
- Identifying Hidden Leaks: Sometimes, the source of the leak isn’t immediately obvious. Use a dry cloth to wipe down the drainpipe and then check for wet spots to pinpoint the leak.
- Dealing with Corroded Pipes: Severely corroded pipes may be too weak to repair. In this case, it’s best to replace the entire section of pipe.
- Using Pipe Joint Compound: For threaded connections that are difficult to seal, consider using pipe joint compound in addition to Teflon tape.
- Tightening Slip Nuts Properly: Overtightening slip nuts can damage the pipes, while undertightening can lead to leaks. Aim for a snug fit that compresses the washer without crushing the pipe.
- Replacing the P-Trap: If the P-trap is cracked or damaged, replace it with a new one. P-traps are relatively inexpensive and easy to install.
- Dealing with Offset Pipes: If the drainpipe is misaligned, use flexible couplings to connect the pipes.
In our experience, one common pitfall is failing to properly clean the threads before reassembling the drainpipe. Even a small amount of debris can prevent a tight seal and lead to leaks. Another mistake is using the wrong type of washer or seal. Make sure to use washers and seals that are specifically designed for plumbing applications.
If you’ve tried these techniques and are still unable to fix the leak, it’s time to call a professional plumber. They have the expertise and tools to diagnose and repair even the most complex plumbing problems.
Preventing Future Leaks: Proactive Maintenance Tips
Preventing leaks is always better than fixing them. Here are some proactive maintenance tips to help prevent future sink drain pipe leaks:
- Regularly Inspect the Drainpipe: Check the drainpipe for signs of leaks, corrosion, or damage.
- Tighten Loose Connections: Periodically tighten the slip nuts on the drainpipe connections.
- Avoid Pouring Grease Down the Drain: Grease can solidify in the drainpipe and cause clogs, which can lead to leaks.
- Flush the Drain with Hot Water: Regularly flush the drain with hot water to help prevent clogs.
- Use a Drain Strainer: A drain strainer will catch hair and other debris, preventing them from clogging the drainpipe.
- Consider Enzyme Cleaners: Use enzyme-based drain cleaners to break down organic matter and prevent clogs. Avoid chemical drain cleaners, as they can damage the pipes.
By following these maintenance tips, you can significantly reduce the risk of future sink drain pipe leaks and keep your plumbing system in good working order.
Choosing the Right Replacement Parts: A Buyer’s Guide
When replacing drain pipe components, selecting the right parts is crucial for a successful and long-lasting repair. Here’s a buyer’s guide to help you choose the right replacement parts:
- Material: PVC is a common and affordable option for drain pipes. It’s durable, corrosion-resistant, and easy to install. Other options include ABS, copper, and brass.
- Size: Make sure to choose replacement parts that are the same size as the original components.
- Type: Select the correct type of fitting for the application. For example, use a slip nut fitting for connecting pipes and a threaded fitting for connecting to a faucet.
- Quality: Invest in high-quality replacement parts from a reputable manufacturer. Cheaper parts may be more prone to leaks and failures.
- Compatibility: Ensure that the replacement parts are compatible with your existing plumbing system.
When purchasing replacement parts, bring the old components with you to the store. This will help you ensure that you’re getting the right size and type of part.
Sink Drain Pipe Repair: Is It Worth Doing Yourself?
Deciding whether to tackle a sink drain pipe repair yourself or hire a professional plumber depends on several factors, including your DIY skills, the complexity of the repair, and your comfort level. Here’s a breakdown of the pros and cons of each option:
DIY Repair:
Pros:
- Cost Savings: DIY repairs can save you money on labor costs.
- Convenience: You can fix the leak on your own schedule.
- Learning Opportunity: DIY repairs can be a valuable learning experience.
Cons:
- Time Commitment: DIY repairs can take time and effort.
- Potential for Mistakes: If you’re not careful, you could make mistakes that could worsen the problem.
- Risk of Injury: Plumbing repairs can involve working in tight spaces and using tools that could cause injury.
Professional Plumber:
Pros:
- Expertise: Plumbers have the knowledge and experience to diagnose and repair plumbing problems quickly and efficiently.
- Guaranteed Work: Plumbers typically guarantee their work, so you can be sure that the repair will be done correctly.
- Convenience: You don’t have to spend time and effort on the repair.
Cons:
- Cost: Plumbers can be expensive, especially for emergency repairs.
- Scheduling: You may have to wait for a plumber to become available.
If you’re comfortable with basic plumbing tasks and the leak is relatively minor, a DIY repair may be a good option. However, if the leak is complex or you’re not comfortable working with plumbing, it’s best to hire a professional plumber.
A Leak-Free Sink: Your Responsibility
Fixing a leaky sink drain pipe is a manageable task that can save you money and prevent water damage. By understanding the anatomy of your drain system, gathering the right tools and materials, and following the steps outlined in this guide, you can confidently tackle this DIY project. Remember to take your time, be patient, and don’t hesitate to consult a professional if you encounter any difficulties. Keeping your home in good repair is a responsibility that can be addressed head-on.
