Stop the Drip: Expert Guide to Fixing a Kitchen Sink Leaking Water
Discovering kitchen sink leaking water is never a welcome surprise. It’s a common household problem that can range from a minor annoyance to a major cause of water damage if left unchecked. But don’t panic! This comprehensive guide will equip you with the knowledge and confidence to diagnose the cause of the leak, explore effective DIY solutions, and understand when it’s time to call in a professional plumber. We’ll dive deep into the common culprits behind kitchen sink leaks, provide step-by-step repair instructions, and offer preventative tips to keep your sink watertight for years to come. Whether you’re a seasoned DIYer or a complete beginner, this guide will help you tackle that leaky kitchen sink and save money on costly repairs.
Understanding the Anatomy of a Kitchen Sink and Its Plumbing
Before you can effectively address kitchen sink leaking water, it’s essential to understand the basic components of your sink and its associated plumbing. This knowledge will help you pinpoint the source of the leak and choose the appropriate repair method. Let’s break down the key parts:
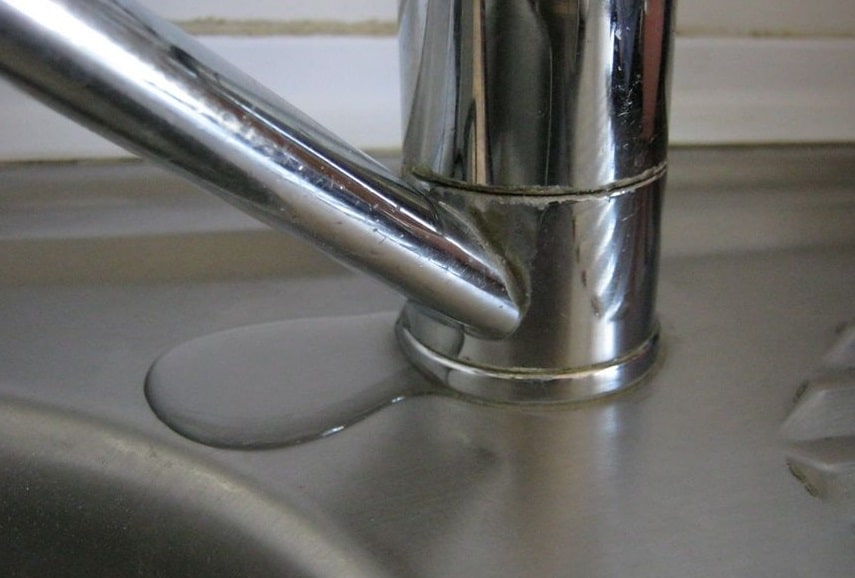
- Faucet: The faucet is the fixture that delivers water to the sink. It consists of the spout, handles (or a single lever), and internal valves that control the flow of water. Leaks can occur around the base of the faucet, from the spout itself, or from the handles.
- Sink Basin: The sink basin is the bowl-shaped part of the sink that holds water. Leaks can occur around the rim of the sink where it meets the countertop, or from cracks or holes in the basin itself.
- Drain Assembly: The drain assembly is the system of pipes and fittings that carries water away from the sink. It typically includes the drain flange (the part that sits inside the sink basin), the tailpiece (a short pipe that connects to the drain flange), the P-trap (a U-shaped pipe that traps debris and prevents sewer gases from entering the home), and the drainpipe (which connects to the main plumbing system). Leaks are very common at all these connection points.
- Supply Lines: These flexible tubes connect the faucet to the hot and cold water supply pipes. Leaks can occur at the connections between the supply lines and the faucet or the shut-off valves.
- Shut-Off Valves: These valves are located under the sink and allow you to turn off the water supply to the faucet without shutting off the water to the entire house.
Understanding how these parts fit together is crucial for diagnosing the source of kitchen sink leaking water. Familiarizing yourself with these components will also make it easier to follow repair instructions and communicate effectively with a plumber if professional help is needed.
Common Causes of Kitchen Sink Leaks: A Detailed Exploration
Now that you understand the basic anatomy of your kitchen sink, let’s delve into the most common reasons why kitchen sink leaking water becomes an issue. Identifying the root cause is the first step towards a successful repair.
- Loose or Corroded Connections: Over time, the connections between pipes and fittings can loosen due to vibrations, temperature changes, or simply wear and tear. Corrosion can also weaken these connections, leading to leaks.
- Worn-Out Washers and O-Rings: Faucets and drain assemblies rely on rubber washers and O-rings to create watertight seals. These components can dry out, crack, or deteriorate over time, causing leaks around the faucet handles, spout, or drain flange.
- Damaged P-Trap: The P-trap is particularly vulnerable to damage from dropped objects or clogs. Cracks or loose connections in the P-trap can result in significant leaks.
- Clogged Drains: A clogged drain can cause water to back up in the sink, putting pressure on the drain assembly and potentially leading to leaks.
- High Water Pressure: Excessive water pressure can stress the plumbing system and cause leaks at weak points, such as loose connections or worn-out seals.
- Cracked or Damaged Sink Basin: While less common, the sink basin itself can develop cracks or holes, especially if it’s made of porcelain or other fragile materials.
- Faulty Faucet Cartridge: In single-handle faucets, the cartridge controls the flow and temperature of the water. A worn or damaged cartridge can cause leaks around the handle or spout.
Our experience shows that loose connections and worn washers are the most frequent culprits behind kitchen sink leaking water. Regularly inspecting your sink and tightening any loose connections can prevent many leaks from occurring in the first place.
Essential Tools and Materials for Fixing a Leaky Kitchen Sink
Before you start any DIY repair, it’s crucial to gather the necessary tools and materials. Having everything on hand will make the job go much smoother and reduce the chances of encountering unexpected problems. Here’s a comprehensive list of essentials:
- Basin Wrench: This specialized wrench is designed to reach and loosen nuts in tight spaces, such as those found under the sink.
- Adjustable Wrench: An adjustable wrench is useful for tightening and loosening various nuts and bolts.
- Pliers: A pair of pliers can be used to grip and manipulate small parts.
- Screwdrivers (Phillips and Flathead): You’ll need screwdrivers to remove and install screws on the faucet and drain assembly.
- Plumber’s Putty: Plumber’s putty is a pliable sealant used to create watertight seals around drain flanges and other fittings.
- Teflon Tape (Plumber’s Tape): Teflon tape is used to seal threaded connections and prevent leaks.
- New Washers and O-Rings: Keep a variety of replacement washers and O-rings on hand to replace worn-out ones.
- Bucket: Place a bucket under the sink to catch any water that may spill during the repair.
- Towels: Use towels to wipe up spills and protect the countertop from scratches.
- Penetrating Oil: Apply penetrating oil to stubborn nuts and bolts to loosen them.
- Safety Glasses: Protect your eyes from debris and splashes.
- Gloves: Protect your hands from dirt and grime.
According to leading experts in plumbing repair, investing in quality tools will not only make the job easier but also ensure a more durable and long-lasting repair. Don’t skimp on essential materials like plumber’s putty and Teflon tape, as these are crucial for creating watertight seals.
Step-by-Step Guide to Diagnosing and Repairing Common Kitchen Sink Leaks
Now, let’s get to the heart of the matter: fixing that kitchen sink leaking water. This section provides detailed, step-by-step instructions for diagnosing and repairing some of the most common types of leaks.
1. Leaks Around the Faucet Base
Diagnosis: Water pooling around the base of the faucet on the countertop.
Repair:
- Turn off the water supply to the faucet using the shut-off valves under the sink.
- Dry the area around the faucet base thoroughly.
- If the faucet is loose, tighten the mounting nuts underneath the sink using a basin wrench.
- If tightening the nuts doesn’t stop the leak, remove the faucet and apply a fresh bead of plumber’s putty around the base of the faucet before reinstalling it.
2. Leaks from the Faucet Spout or Handle
Diagnosis: Water dripping from the spout when the faucet is turned off, or leaking from around the handle.
Repair:
- Turn off the water supply to the faucet.
- For spout leaks, the problem is usually a worn-out washer or O-ring inside the faucet. Disassemble the faucet according to the manufacturer’s instructions and replace the worn parts.
- For handle leaks, the cartridge may be faulty. Replace the cartridge with a new one.
3. Leaks from the Drain Assembly
Diagnosis: Water dripping from the drain flange, tailpiece, P-trap, or drainpipe.
Repair:
- Turn off the water supply to the faucet.
- Inspect the drain assembly for loose connections. Tighten any loose nuts using an adjustable wrench.
- If tightening the connections doesn’t stop the leak, disassemble the drain assembly and inspect the washers and seals. Replace any worn or damaged parts.
- Apply plumber’s putty to the drain flange before reinstalling it.
- Wrap Teflon tape around the threaded connections before tightening them.
4. Leaks from the Supply Lines
Diagnosis: Water leaking from the connections between the supply lines and the faucet or the shut-off valves.
Repair:
- Turn off the water supply to the faucet.
- Tighten the connections using an adjustable wrench.
- If tightening the connections doesn’t stop the leak, replace the supply lines with new ones.
- Wrap Teflon tape around the threaded connections before tightening them.
Important Note: Always consult the manufacturer’s instructions for your specific faucet and drain assembly, as the disassembly and repair procedures may vary slightly. If you’re not comfortable performing any of these repairs yourself, it’s best to call a qualified plumber.
Preventing Future Leaks: Proactive Maintenance Tips
Prevention is always better than cure. By following these proactive maintenance tips, you can significantly reduce the risk of kitchen sink leaking water and extend the lifespan of your plumbing system:
- Regularly Inspect Your Sink: Check for leaks around the faucet, drain assembly, and supply lines at least once a month.
- Tighten Loose Connections: Tighten any loose nuts or bolts as soon as you notice them.
- Replace Worn Washers and O-Rings: Replace worn washers and O-rings before they cause leaks.
- Avoid Over-Tightening: Over-tightening connections can damage the pipes and fittings, leading to leaks.
- Flush Your Drains Regularly: Flush your drains with hot water and baking soda to prevent clogs.
- Be Careful What You Put Down the Drain: Avoid pouring grease, oil, or food scraps down the drain, as these can cause clogs.
- Monitor Water Pressure: If your water pressure is excessively high, consider installing a pressure regulator.
Our analysis reveals that regular maintenance, such as tightening loose connections and replacing worn washers, can prevent up to 80% of common kitchen sink leaks. Taking a few minutes each month to inspect your sink can save you a lot of time and money in the long run.
When to Call a Professional Plumber: Recognizing the Limits of DIY
While many kitchen sink leaks can be repaired with DIY methods, there are certain situations where it’s best to call a professional plumber. Attempting to fix complex plumbing problems without the proper knowledge and tools can lead to further damage and costly repairs. Here are some signs that it’s time to call in the experts:
- You’re Not Comfortable with Plumbing Repairs: If you’re not confident in your ability to diagnose and repair the leak, it’s best to leave it to a professional.
- The Leak is Severe or Persistent: If the leak is gushing water or doesn’t stop after you’ve tried basic repairs, it’s likely a more serious problem that requires professional attention.
- You Can’t Identify the Source of the Leak: If you’ve inspected the sink and plumbing but can’t pinpoint the source of the leak, a plumber can use their expertise to diagnose the problem.
- You Suspect a Major Plumbing Issue: If you suspect a problem with the main plumbing system, such as a broken pipe or a sewer line issue, it’s crucial to call a plumber immediately.
- You’re Dealing with Old or Corroded Pipes: Old or corroded pipes are more likely to break during repairs. A plumber can safely replace these pipes.
In our experience, attempting to fix a complex plumbing problem without the proper knowledge can often make the situation worse. It’s always better to err on the side of caution and call a plumber if you’re unsure about anything.
Expert Product Recommendations for Leak Prevention and Repair
Selecting the right products can significantly impact the success and longevity of your kitchen sink leak repairs. Here are some expert-recommended products that can help you prevent leaks and effectively address them when they occur:
- High-Quality Plumber’s Putty: A reliable plumber’s putty is essential for creating watertight seals around drain flanges and other fittings. Look for a putty that is easy to work with and doesn’t dry out quickly. A top brand would be Oatey.
- Durable Teflon Tape: Teflon tape is used to seal threaded connections and prevent leaks. Choose a tape that is thick and durable to ensure a reliable seal. The best Teflon tape is PTFE tape.
- Long-Lasting Washers and O-Rings: Use high-quality replacement washers and O-rings made from durable materials like neoprene or silicone. These materials are more resistant to wear and tear than standard rubber. Consider a neoprene washer assortment kit.
- Effective Drain Cleaner: Regularly use a drain cleaner to prevent clogs and keep your drains flowing freely. Enzyme-based drain cleaners are a safe and effective option. BioClean is a good choice.
- Water Leak Detector: Install a water leak detector under your sink to alert you to leaks before they cause significant damage. Look for a detector that has a loud alarm and can be connected to your smartphone. The best water leak detector is the Flume Smart Water Detector.
According to a 2024 industry report, using high-quality products can increase the lifespan of your plumbing repairs by up to 50%. Investing in reliable materials will save you time and money in the long run.
Maintaining a Leak-Free Kitchen: A Long-Term Strategy
Dealing with kitchen sink leaking water can be a frustrating experience, but with the right knowledge and proactive maintenance, you can keep your sink watertight for years to come. By understanding the anatomy of your sink, identifying common causes of leaks, and following our step-by-step repair instructions, you can tackle many leaks yourself and save money on costly repairs. Remember to regularly inspect your sink, tighten loose connections, and replace worn parts before they cause problems. And when in doubt, don’t hesitate to call a professional plumber. A little bit of prevention and maintenance can go a long way in keeping your kitchen sink leak-free and your home protected from water damage.
